Guest
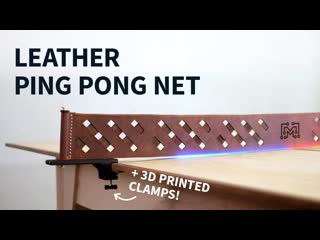
We made a wooden ping pong table with Bob from I Like to Make Stuff () and had to make a really cool leather net using lasers and 3D printing to go along with it! Bob’s awesome ping pong table: Patreon and Aftershow Merch Instagram @evanandkatelyn Check out our sponsor ISOtunes, our fave hearing protection: TOOLS / MATERIALS (affiliate) ■ Heat set threaded insert ■ Brass thumb nuts ■ Leather lacing chisel (poking device!) ■ Waxed cord ■ Large-eyed needle ■ Barge contact cement ■ Rotary cutter ■ Glowforge laser cutter ■ TAZ MOARstruder tool head ■ 3d Printer (Taz6) ■ Matterhackers Black PLA ■ Copperfill mm - ■ Copperfill mm - FILMING GEAR (affiliate) ■ Fujifilm X-T10 (main camera) ■ 35mm F 1.4 lens (makes things look fancy) ■ Sony Cybershot DSC-RX100 V (vlog and slow-mo camera) ■ Mic for voiceovers ■ Pop filter for voiceovers ■ Desktop sound booth ■ Wireless lav mics ■ Main tripod ■ Pan head for tripod STAY UP TO DATE ■ Instagram @evanandkatelyn ■ Twitter ■ Pinterest ■ Blog ■ Etsy This project has two parts, leatherworking for the net and 3D printing for the supports. We started with the leather. We were also using a laser in one of our projects for the first time and learned a lot about both. After a lot of experiments (read: trial and error) we settled on a crisscrossing design for the leather net. We cut and engraved it in 7 different setups on the Glowforge. We used tape to help w/ these setups and keep everything spaced evenly. Once we were done with the laser cutting it was time for another first! Hand stitching leather. Also super satisfying. Throughout the leatherworking we were working on our clamps. We had modeled the clamps before we went up to see Bob and thought that making them would be a cakewalk, especially when we found out that he had the MOARstruder (which honestly was amazing), but of course we ran into complications. After remodeling almost everything and a lot of fiddling it functioned great. We didn’t finish or paint anything because the black PLA with the super thick layer lines actually looked pretty nice. We also really liked the brass accents we used for the thumb nuts (and also the heat set threaded brass insert, even though you can’t see it much). MUSIC Joakim Karud: Future Funk THANK YOU TOP PATREON SUPPORTERS! ■ Katelyn’s Mom ■ Brandon’s Bees ■ Bruce A. Ulrich ■ Kit Low ■ Infinite Craftsman ■ Zach and Jazz ■ Corey Ward ■ Figments Made ■ Vincent Ferrari ■ Scooter’s Workbench ■ Corso Systems ■ Brooke Boen ■ Matt Baker ■ Jason Kaczmarsky ■ Cameron Dorsey ■ David Granz ■ Maxine Denis ■ Elliot Iddon ■ Allen Canterbury ■ Making LoCo ■ Small Fry Creations . ■ George Partin ■ Sam Atkins ■ Thistledoo ■ Joel Telling ■ Hubbard’s :// ■ Will Burke ■ Richard Johnson ■ ManCrafting ■ TexWoodBuilds ■ Miter Mike’s Woodshop ■ Jon Schwartz ■ Chris Hayes ■ David Bellhorn ■ Ryan Erskins ■ SeaBass ■ John Made It ■ Jonny Builds ■ Kyle Hord ■ Evan’s parents ■ Nick Biederman ■ Chuck Burgmuller ■ Pamela Toh ■ Laura Kampf ■ Make Build Modify ■ Kaia Works ■ Michael Pilosov ■ Alex Bate ■ fun-tom ■ David Bauer ■ Jose Carlos Padial Diaz-Merino ■ Brian Santero ■ Tyler Bell ■ MakerBarn ■ Daniel Tyson ■ Tehzett ■ Emily & Ella Early ■ Frank Wiebenga ■ Josh Hess ■ Matt Becker ■ Roman ■ Brendon Otto ■ Bryce Plays G